Explore a comprehensive overview of Matrix Themes in this guide, which will help you understand how they work and how to customize your website.
Introduction
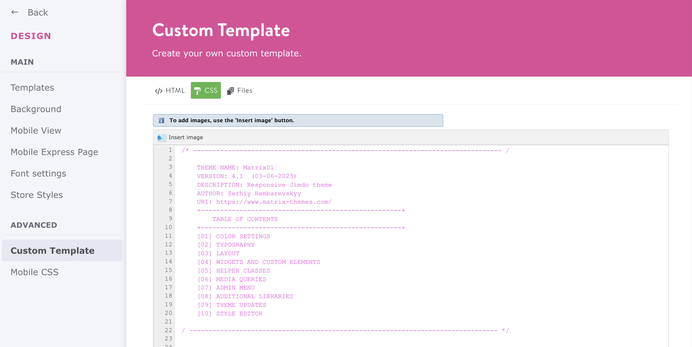
Matrix themes are based on a custom layout available in the Jimdo website builder (Jimdo Creator). The content management system (CMS) provides you with the ability to create your own template. Once installed, you can locate it under Design > Custom Template.
Matrix Themes assets
There are 5 main assets of Matrix theme:
1. HTML ( Design> Custom Template> HTML )
2. CSS ( Design> Custom Template> CSS )
3. CSS components ( Design> Custom template> Files)
04.custom-widgets.css
05.helper-classes.css
06.media-queries.css
07.admin-menu.css
08.libraries.css
09.updates.css
10.style-editor.css
4. Font Awesome icons ( Design> Custom template> Files)
5. JS file ( Design> Custom Template> Files )
matrix.js
After installing the Matrix theme on your Jimdo website, you will find an additional menu in the admin mode, containing all resources:

- Documentation: general documentation of Matrix Themes
- Components: custom widgets
- Page Blocks: full width block widgets
- Fluid sections: drag/drop full width sections
- Animations: Full resources for animations
- Media Library: free stock image library
- Add-ons: additional custom widgets & plugins
- Templates: template selection
- Updates: theme updates
- Helper classes: the full list of helper classes used in Matrix Themes
- Support: Support guides and tutorials
- Custom Layout: quick access to custom layout
Please note that once you switch to a custom layout, some sections of the Jimdo admin will change. For example, the Style tab will be disabled. However, to change the colors and styles of your website elements, you'll have the advanced style editor from Matrix themes.
Style Editor
After installing the Matrix theme on your website, you'll need to add the advanced style editor to customize your website without any coding. Navigate to the Matrix Themes admin menu, access the "templates" section, and follow the instructions to add the style editor in just two simple steps.
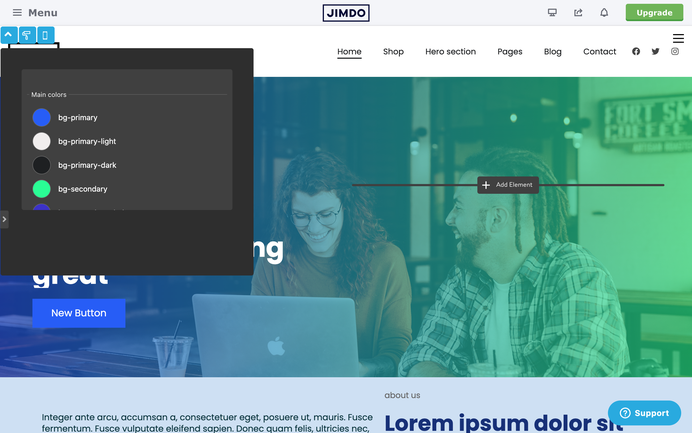
The advanced style editor includes the following features:
- Color settings: Customize the color setup of the main elements of your website, including brand colors and template sections (header, content, footer, buttons, etc.).
- Template configurations: Utilize template configurations to add custom classes for each section, defining the design of your website. This includes adjustments to navigation alignment, styles, default buttons, and contact form styles.
- Custom CSS: Add further customizations to your template or widgets using the Custom CSS option."
How to add custom widgets
The custom widgets of Matrix Themes are available in section 'Components' ( Shortcodes in previous versions). You can select any widget using the copy button and paste the code inside 'Widget/HTML'

There are several sections in the Matrix Themes admin menu where you can find custom widgets to enhance your website:
- Shortcodes: The primary custom widgets designed for the Widget/HTML module. These widgets can also be added to Widget/HTML modules placed within columns.
- Block Elements: Full-width custom sections used with the Widget/HTML module. Block elements cannot be used within columns.
- Add-ons: Additional custom widgets and plugins.
- Fluid Sections: Full-width custom sections with drag-and-drop options. The code for fluid sections should be placed inside the Text module and not the Widget/HTML module.
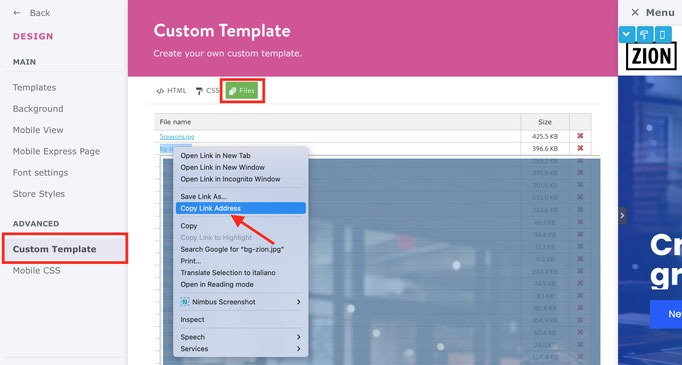
Uploading the files
To change the custom widgets, including a photo, to your own, please follow these steps:
- Go to Custom Layout and select the Files tab
- Upload your own image by using the upload button.
- Once the file has been successfully uploaded, you will see the name of the file displayed in the list of files.
- Right-click on the file and select "Copy link address."
- Paste the link in the appropriate location within the Widget/HTML.
<div class="is-matrix cc-clearover">
    <div class="hs-thumbnail">
        <img src="https://u.jimcdn.com/cms/o/s572cf8a914c2631f/userlayout/img/matrix-teaser.jpg?t=1405356750" alt="" /
    </div>
</div>
Template selection

There are 3 main Matrix templates:
- Multipurpose Themes: Versatile templates featuring dropdown menus for enhanced navigation.
- Multilingual Themes: Specifically designed for multilingual websites, these templates have a language selection feature incorporated into the first level of the menu.
- Special Themes: This category includes templates with unique structures. Currently, there are three options:
Halmstad: A template with sidebar navigation.
Oland: This template features a center-aligned logo image and split navigation on the left and right sides.
Holborn: A template with a split layout, featuring a left-aligned hero section on every page and right-aligned content.
Switching between the templates
The template design is shaped by the advanced style editor present in each Matrix theme. In the admin menu under the "templates" section, you can effortlessly choose any pre-built template and apply it to your website. This allows you to seamlessly switch between themes, such as transitioning from Lemberg to Alsten, Bergen, and more.
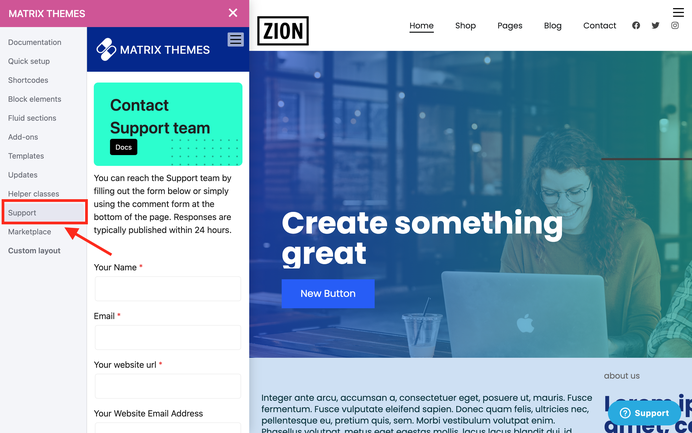
Getting Support
The new documentation pages cover everything from basic info to advanced customization of Matrix themes. Each page has a comments section, so you can ask questions about that topic.
You can also find the quick documentation sections in the Matrix Themes admin menu and along with a "Support" section you can leave a comment or use the contact form to reach the Support team.
Documentation

| bg-primary | |
| bg-primary-light | |
| bg-primary-dark | |
| bg-secondary | |
| bg-secondary-dark |
| body | |
| top-header | |
| top-header-inner | |
| header | |
| header-inner | |
| navigation-inner | |
| navigation color | |
| dropdown background color | |
| content |
| background | |
| text color | |
| link color | |
| horizontal line |
| style 1 | |
| style 2 | |
| style 3 | |
| text color |
| background color | |
| navigation color |
| social icons | |
| top header border | |
| header border | |
| nav inner border |
| Template configurations | |
|
|
| Top header inner | |
| Header inner | |
| Navigation inner | |
| Navigation styles | |
| snip-nav --line01 is-uppercase | |
| Sub-menu (breadcrumbs) styles | |
| size-15 | |
| Mobile Navigation styles | |
| size-30 | |
| Content styles | |
| form-white | |
| Footer styles | |
| o-form color-white white-outline-btn | |
| Footer background image | |
|
Typography |
|
| Heading H1 | |
| weight-400 | |
| Heading H2 | |
| weight-400 | |
| Heading H3 | |
| weight-400 | |
| Buttons | |
| weight-400 | |
| Advanced settings | |
| Custom CSS | |
|
#cc-inner .my-class { color:#f0f0f0; }
|
Note: All changes made here will be applied to your entire website.
Bernhard Häfliger (Saturday, 21 March 2020 17:37)
is it possible upload more than one parallax picture?
and how I've change the Elephant's with my picture?
Thanks
Serhiy (Monday, 13 January 2020 13:50)
@Andreas Pro or Business version
Andreas (Monday, 13 January 2020 13:40)
Are this changes possible with JimdoFree or must I before buy the JimdoPro?
Serhiy (Monday, 13 January 2020 12:12)
@Andreas please use 'no-hero' as body class ( see the details in documentation)
Andreas (Monday, 13 January 2020 09:51)
Hello Serhiy! I use the oland template and would like to remove the background image above the inserted slider on the start page. Thanks!
Richard (Saturday, 02 November 2019 11:32)
Great! Thanks!
Serhiy (Saturday, 02 November 2019 10:47)
@Richard
1) section "quick setup"
2) section "shortcodes"> awesome buttons
Richard (Saturday, 02 November 2019 10:41)
Hi Serhiy,
1- How do I change the background colour of the footer?
I tried to change .hs-footer, .footer-btm and .footer-top in CSS, but without any respons.
2- Is it possible to change the colours of the buttons in two variations? I would like to try transparant filling + text and outline in black or white (depending on the background). Is that possible?
Serhiy (Thursday, 31 October 2019 13:50)
https://www.rapidtables.com/web/html/link/html-anchor-link.html
Richard (Thursday, 31 October 2019 13:26)
Hi Sherhiy, it is in templates like https://lemberg-template3.jimdo.com/#scroll and probably a lot of other templates with a one page option. I see now that these are specific variations of certain templates. Too bad, since my customer likes this very much (it was also used in his former website).
Is there a work-around possible to realise this in the Alsten template?
Serhiy (Thursday, 31 October 2019 13:04)
@Richard I think it's been misunderstanding.
I have no tutorial about anchor links to a specific section of the page. Can you show me please a matrix themes you saw it?
There are templates with one page layout and anchor links in navigation. Those templates have a specific layout structure and features which are not available in other templates ( multilingual, multi purpose and templates with megamenu )
Richard (Thursday, 31 October 2019 12:50)
Hi Serhiy, I am using the Alsten template, but when I am looking on the Matrix website, I see 11 templates, but none of them is called "One Page". Can I also use one page technology in Alsten? How do I proceed?
Serhiy (Thursday, 31 October 2019 12:44)
@Richard this section and feature is only available in one page layout ( matrix themes menu> one page)
Richard (Thursday, 31 October 2019 12:40)
Hi Serhiy, I like to know more about these one page layout. Where to find that?
Serhiy (Thursday, 31 October 2019 12:32)
@Richard In custom widgets ( module Widget/HTML ) you need to add manually the url of the linked page, while using text, jimdo CTA etc, you can add a link with default Jimdo tools ( see the screenshot https://u.jimcdn.com/cms/o/s1aeecbbb2a5865b1/userlayout/img/adding-links.png?t=1572521319 )
I don't have tutorial for linking a specific section of the page. This options is available in one page layout.
Richard (Thursday, 31 October 2019 12:18)
I am looking for instructions how to navigate to a certain shortcut on a page. For instance from a CTA or Read More button or teaser. I miss the original Jimdo method to a link to another page, but I also need an a:link to go to a specific place on the same page. Can you help me out?
Richard (Monday, 28 October 2019 10:32)
I missed that one indeed (there is so much to read and to find out), but it works! Thanks.
Serhiy (Monday, 28 October 2019 10:26)
Richard, you haven’t read the instructions ( shortcodes> shortcodes ) about how to upload your own image and change it in custom widgets
Richard (Monday, 28 October 2019 10:22)
Hi Serhiy,
But how can I change the picture? The image source is now: "https://u.jimcdn.com/cms/o/s572cf8a914c2631f/userlayout/img/matrix-teaser.jpg"
But where is file this located and how do I put my own pictures in place?
Serhiy (Monday, 28 October 2019 10:00)
@Richard there's no further instruction for the widget "overlay teaser"
Richard (Monday, 28 October 2019 09:52)
Where can I find more instructions about the Matrix Widget overlay teaser?
I like to customise them.
Serhiy (Monday, 25 February 2019 12:58)
@Sandra in admin mode you can see the red box in your content section " Edit here your header title". Just click it and edit for your preference
Sandra Kolodjezak (Monday, 25 February 2019 12:57)
Hallo, wie kann kann ich den Text "Your Hero Titel" auf meiner Startseite ändern?
Agnieszka (Friday, 28 September 2018 13:00)
@Serhiy, thank you, It is gone.... easier than I thought :-)
Serhiy (Friday, 28 September 2018 12:18)
@agnieszka the hero caption can be edited in red box widget placed in content area of your website
agnieszka (Friday, 28 September 2018 11:26)
Hi how can you remove the NEVER LØØK BÆCK text from the overlay header part of the template?
I have uploaded my own picture, still the writing has remained.
thank you
Serhiy (Friday, 13 July 2018 16:11)
@Marcel all you have to do is to change the image url inside of the widget code. From your page I can see that one parallax widget is correct while for the second image you used the wrong widget - fullwidth image.
Marcel (Friday, 13 July 2018 15:58)
How to change the parallelax image. If I change it with a new photo, it's completely bown up. I want to have a normal sized photo at the background with scrolling text.